August Tech Tips - Trucks Performance & Code 88 & Code 110 wheels
9
Aug
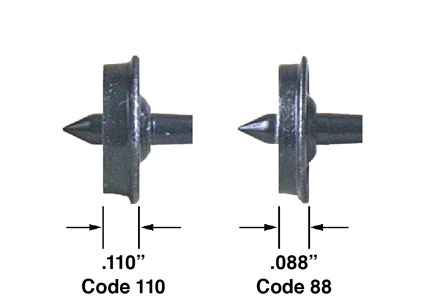
The difference between Code 88 & Code 110 wheels
This is one of those questions we get from time to time. Many new modelers think that wheel code refers to the track code that the wheels are made to run on. This is incorrect. The term Code 110 and Code 88 relates to the width of the wheels and has no relationship to track code (see photos). Code 110 wheels are ”standard” width wheels and will run on Code 100, Code 88, & Code 70 track. Code 88 wheels are “semi-scale” width wheels and will run on Code 100, Code 88, & Code 70 track. Code 88 “semi-scale” wheels are used when the modeler wants a more prototypical-looking wheel width. Actual HO-Scale prototypical wheel width would be around .067” wide, and although they will run OK on the average track, they will not go through common turnouts and crossings. Code 88 (.088”) is just about the minimum width of wheel that will run on most standard or common track if gauged correctly. It is really a matter of appearances because there’s very little operational differences between running Code 110 or Code 88 wheels. Code 88 wheels look really good and are most noticeable on open-frame cars like hoppers and tank cars. They also look great on box cars, gondolas, and reefers but are not quite as noticeable. As mentioned above, track code and wheel code have no relationship, meaning Code 110 and Code 88 will run on most any code of track. Track code is simply the measured height of the rail; code 100 is .100” tall, code 83 is .083” tall, code 70 is .070” tall, and so on.
Mounting Kadee® trucks on cars and optimizing trucks performance during mounting
Kadee® trucks, as well as most after-market trucks, are designed to mount on a flat surface with a #2 size screw. Ideally, they would be mounted by drilling and tapping a hole for a 2-56 screw so the trucks are serviceable. This may require trimming off any post the original truck pivoted on or filling in a hole if the original trucks were attached with a screw larger than a #2 screw or a push pin. The hole would have to be filled in with body filler, or gluing styrene tubing in the hole. Then drilling and tapping a hole for a 2-56 screw to mount the trucks to the car.
Now make sure the surface where the truck is smooth and flat, and level. If the post was not trimmed and filed off flush and level, the car will not set on the truck level, and the car will tip and or bind, causing derailments in corners or switches. Remember, it is important to inspect and clean any rough spots, if there are any, making sure none of the components bind. At this point, it would be a good idea to lubricate the screw and burnish (polish) the truck bolster and underframe where the parts make contact, with #231 Greas-em dry graphite lubricant. The truck needs to move & pivot freely on the screw and car. If there is friction one way but not the other way, the car may operate in one direction but not the other direction through corners or switches.
Trucks, normally pivot directly on the screw, however, self-centering trucks pivot on a self-centering bushing that the screw attaches to the floor of the car. (The self-centering feature disengages from the truck when the car is placed on the track. Therefore, the truck acts like any other normal truck when the car is on the track or the car is flipped over for servicing.) The self-centering feature only engages when you pick up a car and the trucks are dangling in the air. The truck then engages the self-centering bushing and aligns the trucks to the car for easier placement of the trucks on the track. So, as you are installing the self-centering trucks be sure to lubricate the bushing and burnish (polish) the truck bolster and underframe where the parts make contact with #231 Greas-em dry graphite lubricant. It is also important to inspect and clean any rough spots, if there are any, so none of the components bind. As stated earlier the truck needs to pivot freely, and if there is friction one way but not the other way the car may operate one direction but not the other direction through corners or switches.
Kadee® fully sprung trucks, both the springs and side frame can be manually fine-tuned to reduce the pressure on the axle cone tips reducing resistance and increasing the truck performance. Kadee® HGC 2-piece truck design reduces the pressure on the axle cone tips reducing resistance. Once again, I can’t stress this enough, the simplest thing one can do to improve performance is apply some #231 Greas-em dry graphite lubricant to the axle cone tips and side frame axel pocket on any truck, will reduce friction and increase rolling performance. Don’t forget about adding the #231 Greas-em dry graphite lubricant to the truck mounting also to make sure the trucks rotate back and forth freely.